Vanilla cupcakes studded with chocolate chips and topped with peanut butter frosting, chocolate shavings, toffee, and butterscotch caramel. A cupcake worthy of the name TGIF!
This recipe was inspired by a book I read last week. I don’t know if it’s like this for anyone else, but there always seems to be a food theme in every book I read…. or at least there is in my mind.
And maybe “theme” is a bit too strong of a word. But do you know what I mean? You’re reading a book, and maybe it’s set in Antebellum South, and the main character eats a lot of cornbread smothered in honey and butter. All of a sudden, all I can think about is cornbread and honey.
Or the main characters frequently hang out at the local pizza joint. Now all I want to eat is pizza.
You get the picture.
In last week’s book (which was #3 in the Porter Family Novel series by Becky Wade), a side character (who was the main character in #2) works in a bakery, and this is cupcake is her Friday specialty. The moment I read the description, I knew I wanted to recreate it for you guys.
And so…. ta-da!
This has been one of my favorite recipes that I’ve made in a while, and I’m thinking that it needs to be recreated into a layer cake, a poke cake… possible fudge? Definitely into a cookie. So expect more TGIF treats to grace the blog before too long.
And I think these flavors are perfectly timed for Fall. They’re rich with deep notes of toffee and butterscotch and just perfect for winter comfort sweatpants food.
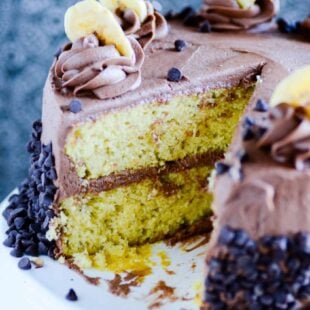
You have to try this cake made with layers of pumpkin cake and pumpkin chocolate cake and cream cheese frosting. And don’t forget the butterscotch caramel!!
There are FOUR outrageously delicious flavors happening in this cake.
Can you guess them just by looking at the outside?? One of the flavors is a little tricky, but I bet you can do it.
You guys. This butterscotch caramel sauce is basically heaven on earth. I’ve been eating it on everything lately– apples, ice cream, straight outta the jar. It’s SO GOOD.
So don’t judge me too harshly for not whipping up a batch from scratch. I just figure, why fix what’s not broken, right? Plus…. it just makes things that much easier. Which is always A-Okay in my book.
Ok, so I am being 1000000000% for real when I promise you: this cake is SO EASY. Here’s the basic breakdown:
Both cakes are overly simple using just cake mix, pumpkin, and a little milk. You’ll need a yellow cake mix, a chocolate cake mix, and two cans of pumpkin puree (NOT pumpkin pie filling).
Next, you’ll make my favorite cream cheese frosting. It’s easy. You can do it.
Last, you’ll buy that amazing butterscotch caramel sauce. I found it at Target near the ice cream. You could also use my other favorite– Smuckers Caramel Delight Sundae Sauce (which I also usually buy at Target).
And voila! You’ll have one incredibly moist, flavorful, and beautiful cake perfect for ushering in pumpkin everything season Fall.
Perfectly baked pumpkin donuts coated with cinnamon sugar and topped with Nutella.
My daughter knows no seasonal boundaries when it comes to her love of pumpkin.
Regardless of the time of year, when we let her choose the dessert for family night– it’s always pumpkin pie. Always. Which is so funny to me, because she is an incredibly picky eater especially in regards to texture. And it took me until adulthood (and years of acquiring more adventurous palate) to appreciate a good pumpkin pie, because I always felt like it was kind of slimy.
It is, after all, a cold pie made of squash. I feel like kids have a right to be a little leery when it comes to pumpkin pie. But not my girl!
As much as I love a good pumpkin pie (now), I just feel like there is so much more fun to be had when it comes to pumpkin season.
Pumpkin + Nutella is the kind of flavor combination that dreams are made of. Initially, I thought I might make some sort of Nutella “glaze” or Nutella “frosting.” But then I realized… why mess with perfection? So I warmed up a bowl of straight-up Nutella and dunked my cinnamon sugar coated pumpkin donuts right in.
And I didn’t regret it. No siree.
If you’re ready to begin your fall baking (and really, who’s not??), may I suggest that you start right here. Dig out that pumpkin, ya’ll! It’s Fall!
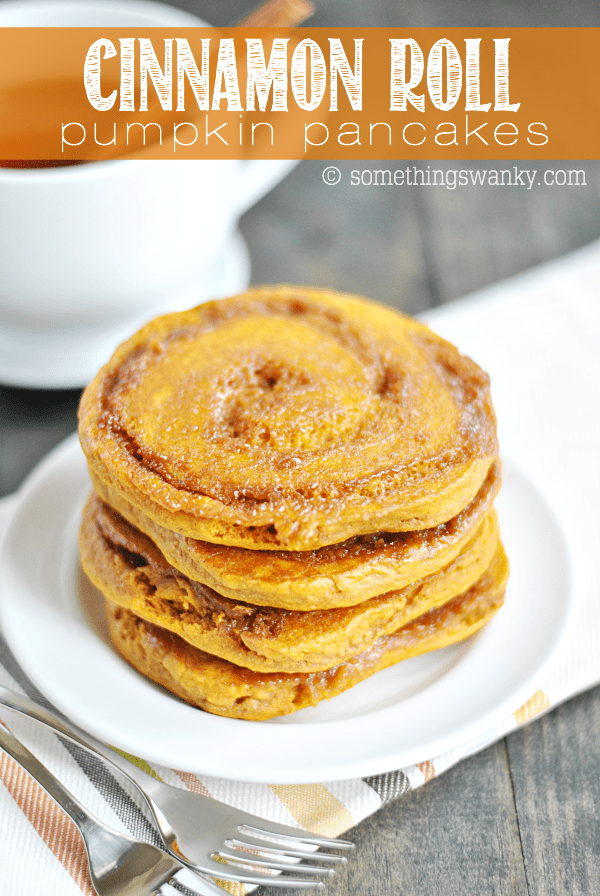
Pumpkin pancakes with a cinnamon swirl that melts in your mouth. Good morning!!
I have a serious love-hate relationship with cinnamon roll pancakes.
They were suuuuuuuuper popular about a year ago. And it’s no wonder why– the pictures were absolutely drool-worthy. And the concept: totally genius. I mean, who doesn’t want cinnamon roll filling swirled in their pancakes smothered in cinnamon roll frosting? Everyone does.
But have you ever tried to make them?
Ohmygosh. I tried about a bazillion times last year before I just finally gave up. Every time I tried, my cinnamon swirl leaked out of the pancake all over the place, filling my kitchen with the semi-permanent smell of burning sugar. And, uh, burning sugar is HOT. So there were definitely more than a few finger blisters involved. It was messy, smelly, and painful. It’s idiotic that I tried to make them as many times as I did.
But those pictures!!!! I mean… they just look so perfect! So why weren’t mine turning out like I thought they should?
This idea for cinnamon roll pumpkin pancakes has been nagging at me for a few weeks, and I kept pushing it away– not wanting to look a-fool in my kitchen again (not to mention wanting to spare my hands the burns!). But, in the end, this recipe was just too tempting not to try.
So I gave it some careful thought and drew up a game plan for making painless, mostly mess-free cinnamon roll (pumpkin) pancakes. And it worked!
Although, in full disclosure: one of the improvements I made to this recipe was simply to lower my expectations. I just realized that no matter how hard I tried, some of the cinnamon swirl was going to leak out of the pancakes. Once I came to terms with that, the rest was a breeze!
Be sure to read these tips before heading to the kitchen!
I added cornstarch to my cinnamon swirl mixture. It helped hold “things” together a bit and keep it from leaking out of the pancakes any more than it did.
Be SURE to insert the tip of your piping bag or bottle into the pancake batter a bit when piping on the cinnamon swirl. DO NOT simply pipe the swirl on top. It needs to be in the batter a little bit.
Pipe the swirl IMMEDIATELY after scooping the batter onto the griddle (just to ensure that you can pipe into the batter and not on top).
Let the pancake cook really, really well on the first side. You don’t risk drying out the pancake, thanks to the pumpkin (which keeps things extra moist). And by allowing the majority of the pancake to be cooked before flipping, you won’t lose quite as much cinnamon swirl on the “flip side.”
The edges of the pancakes should be dry, and the top of the pancake should look a little dry as well with bubbles that don’t pop and fill in.
Clean the griddle with a paper towel in between batches. It’s not as much work as it sounds if you do it in between each one. Getting the extra sugar off the griddle will prevent burning, and it will make things A LOT easier to clean in the end.
If you have an electric griddle, USE IT. Electric griddles are awesome for cooking evenly and preventing burned food. I’m not so sure how these would have gone over on the stove-top to be honest.
If you like to lick the brownie batter bowl, you’ll love this single serve brownie batter dip made just for one!
This brownie batter dip is INSANE you guys. It’s thick and rich, right on the money for texture and flavor. If you’re a bowl-licker, you’ve come to the right place my friend.
Not only does this single serve brownie batter dip taste just like brownie batter, and not only is it a perfectly scaled down recipe meant just for one, guess what else? It’s actually kinda, sorta healthy!
WHAT?!
This recipe’s key to success and star ingredient is ALMOND BUTTER. And everybody knows we need those healthy fats! Plus, this is what makes the brownie batter thick and so much like the real stuff. I was worried that the almond butter taste would be overpowering, but not so. The other ingredients balance out perfectly.
The sweetener? Honey. Also a major player in the texture game.
And, of course, we’ve got flour, cocoa powder, salt, and vanilla. All major components to real brownie batter. I also added mini chocolate chips and walnuts, because I need a little crunchy ????.
PS- If you’re concerned about eating raw flour, you can heat treat it in the oven before using it.
Eat it as a dip with apples, pretzels, graham crackers, and strawberries. Or just grab a spoon and dig in. I won’t judge ????.
Sweet pull apart bread made with Pillsbury cinnamon rolls, apple pie filling, and topped with a mouth-watering cinnamon icing.
Have you ever made pull apart bread before? And I’m not talking about monkey bread. I mean flattened flaky layers of cinnamon rolls layered with decadent fillings and iced on top. I’ve seen several different variations across Pinterest and the internet. Some are filled with chocolate. Others with cinnamon. I saw several with different kinds of pie fillings ????.
This was my first time making a pull apart loaf, and, since I’ve been feeling the urge to do some Fall baking, I decided to make this an apple pie pull apart loaf ????.
The mechanics of this pull apart loaf could not be easier.
All you’ll need to do is grab three easy ingredients (2 cans of cinnamon rolls, apple pie filling, and a little extra cinnamon) and preheat the oven for 350F.
Flatten the cinnamon rolls with your hands, and simply alternate each cinnamon roll with a small spoonful of apple pie filling.
And OMG! The way your kitchen will smell while this is baking!! If you aren’t already in the mood for Fall, I can guarantee that the smell of this loaf wafting through your home will do the trick.
Now, if you wanted to, you could leave out that extra bit of cinnamon and make this a two-ingredient easy-peasy recipe.
But if you’re like me and can’t resist a little extra cinnamon, mix it into the frosting that comes with the cinnamon rolls before you spread it over the warm bread. Ah-mazing. It’s like cinnamon rolls and apple pies and a donut had a baby. It’s basically the best thing ever.
I think I’m finally ready to trade in my summer shades and s’mores if this is what Fall has to offer ????.
If you liked Hostess Cupcakes in your lunchbox as a kid, you’ll love this cake version that’s all grown up!
OH my gosh. This cake. YOU GUYS! Where to even begin?!? Because, honestly, this cake was all kinds of ridiculous. In the very best way…
I remember back when my mom would pack my lunches and would on a very rare occasion send me to school with a Hostess Cupcake in my lunchbox. I tried to not let my friends see me geek out over a cupcake in (but seriously, how come none of the other 5th graders ever seemed as fall-over-yourself excited about cupcakes as I did?? Was I truly alone in that feeling?!). So I’d carefully set it aside until I had finished my lunch. I wanted it to be the very last thing that I tasted before going back to class.
And there was no just shoveling the whole thing in my mouth. Oh no. I took my time and savored each component separately. First, I peeled (yes, peeled, you know what I’m talking about!) off the chocolate icing and ate that first. Next I scooped out the cream filling. And finally, I’d eat the remaining cake. If I was lucky enough to get a Hostess Cupcake in my lunchbox, you can darn well believe I made it a full-blown experience when it came time to eat it!
Being the mature adult that I am today, it’s been long, long time since I’ve sampled fine packaged delicacies such as a Hostess Cupcake. But that doesn’t mean I hold it in any less regard. In fact, I made this cake as an ode to my favorite lunchbox treat!
Basically, if a Hostess cupcake grew up to be a full-blown layer cake, this is what it would be. And it’s nothing short of OMG SO GOOD. To use my most eloquent terminology there.
One of my very, very favorite recipes I’ve found as I’ve dug around for new chocolate chip cookie recipes has been this King Arthur Oatmeal Chocolate Chip Cookie recipe. I have used it over and over and over again (here with M&MS and here with Reese’s Pieces), and it is consistently phenomenal.
And the recipe couldn’t be more straightforward.
Butter.
Brown sugar
Sugar.
An egg and an egg yolk (for extra thick and chewy cookies!).
Oatmeal and flour.
Aside from a few littles teaspoons of this and that, that’s really all there is to the recipe!
Oh, and today, Snickers OF COURSE!
I couldn’t resist taking my favorite oatmeal chocolate chip cookie recipe and adding my current candy bar crush to it.
You know the best part about adding Snickers to cookies? The ooey, gooey melted caramel and nougat. It’s THEE best, and I don’t know why we bother eating cookies any other way.
Take it from me: happy people eat warm cookies stuffed with Snickers.
You don’t need a mix to make these soft and buttery chocolate chip cookies that taste like a sprinkle-filled piece of cake! Cake Batter Chocolate Chip Cookies are handheld cakes.
If you’re anything like me, you’re obsessed with freshly baked chocolate chip cookies. Obsessed. Could you tell? I like my cookies a little crispy and golden around the edges, soft and chewy in the middle, and PACKED with chocolate.
I also LOVE funfetti cake. Which is why I created this cake batter-cookie hybrid with lots of chocolate, sprinkles, and that buttery golden yellow cake taste (without using a cake mix).
What gives these Cake Batter Chocolate Chip Cookies that cake batter taste without the cake mix?
Three simple extracts that, when combined, become a magical funfetti taste twin. Vanilla extract, almond extract, and butter extract (you can find all three of these at virtually any grocery store) all come together in this recipe to create cookies that taste just like cake batter.
If you’re not a fan of almond extract, have no fear. It won’t stand out on it’s own at all.
I took my favorite homemade yellow cake and made it better.
I am particularly excited about this cake, because…. IT’S MY BIRTHDAY!
And I like my birthdays. A LOT.
So, in celebration of my very favorite day of the year, I’m sharing my very favorite birthday cake: yellow cake with chocolate frosting and lots of sprinkles!
But I’ve made some upgrades to the cake recipe, so that it’s moister, softer, and fluffier! And I couldn’t use the same chocolate frosting as before. That particular frosting was made to be EXTRA creamy. Which is amazing. But it doesn’t work quite as well on a stand-alone layer cake. I needed to make a chocolate buttercream that could hold it’s own for this cake.
Let’s talk about this cake.
Hopefully, you guys know by now that I put the SIMPLICITY of a recipe at the top of my priority list before I post something new. It’s important to me that all of my recipes are completely do-able in a REAL LIFE chaotic, busy, never-enough-time, at-home setting.
In 99% of my recipes you will NOT find much chilling, softening, sifting, or anything else that is time consuming. With that being said, I hope you’ll trust me when I tell you something like this…
The ingredients that go into the batter of this cake must be brought to room temperature. I wish I was joking. But after umpteen hard and dry yellow cakes, I’ve finally conceded the fact that I have to let all the cold ingredients come to room temp before whisking up the batter.
If you plan it right, it’s really not a big deal. Set the stuff on the counter early morning or even the night before and you’re ready to go a few hours later. And great news– you can actually just melt the butter! So that’s one less cold ingredient you have to worry about.
Just promise me you’ll wait for the ingredients to come to room temp. If you’re desperate for a quick cake, use a mix. I won’t judge you. But don’t rush this recipe!
I could not believe the difference it made to simply let the ingredients come to room temperature before mixing. The cake was moister, fluffier, and downright yummier than any other from-scratch yellow cake I’ve ever made before!
And that chocolate frosting is everything. I don’t know what it is about yellow cake and chocolate frosting, but I just don’t think it gets any better than that. The only thing I would dream of adding is a gigantic scoop of vanilla bean ice cream!
Enjoy 🙂 And Happy Birthday to all the rest of you July birthdays out there!!
No thermometer needed for this easy fudge! All you need are a few simple ingredients and a love of sprinkles.
It’s been way too long since I posted a Funfetti recipe! I looked it up. It’s been over a month. And I haven’t made any fudge since Christmas!
So, yeah. This cake batter fudge was absolutely necessary.
Especially because I’m a fudge-all-year-round kinda girl. I L-O-V-E fudge.
I know making fudge can be kind of intimidating. But no need to worry when you’re here. On Something Swanky, we pretty much exclusively adhere to only shortcut fudge-making methods.
Not that I mind using a candy thermometer here or there. But when it comes to fudge, I just feel like there are so many really, really good EASY fudge-making methods, that I feel like any kind of complicated recipe is just totally unnecessary.
This recipe for cake mix fudge was really popular a few years ago, but I never got around to it for some reason. It’s always been nagging at me in the back of my mind, and I’m so thrilled that I finally tried it! It is insanely easy and SO good.
And by easy, I mean c-r-a-z-y easy. Like… melt some butter, mix some stuff, and pop it in the fridge. That’s pretty much all there is to it.
Just be sure to be gentle when you mix in the sprinkles, and don’t add them until the very end! Sprinkles tend to bleed their colors in warm mixtures, which can look kind of messy in this fudge. Still tastes good though, so no worries if yours bleed a little bit ????.
This is the best banana cake! It’s simple to whip up, starting with a mix, and is supremely moist and flavorful. The chocolate cream cheese frosting is amazing too 🙂
We always, always have old bananas on the counter. Mostly because every time I go to the grocery store, I get all fired up about eating more fruits and vegetables and buy out the produce department. And then, I’m ashamed to admit, a lot of it just sits around for the rest of the week… not getting eaten. Oops!
Thank goodness, old bananas are a LOT easier to rescue than, say, slimy old green beans. ????
I’ve been wanting to make a banana cake that starts with a cake mix. I love the concept of just throwing a few ingredients into the bowl and whipping up a perfectly soft and fluffy cake. I’ve never been one to shy away from a cake mix, and I’ll say it again: I love that you know what you’re getting with a mix.
You know the cake is going to be soft, fluffy, moist, and flavorful. It’s just so reliable! You know the texture is going to be good and that it’s going to bake up just right. I’ve yet to use a cake mix and be disappointed.
So it’s no surprise that this recipe ended up being a slam dunk.
All you need is a yellow cake mix, a 2-3 bananas, and a few other simple ingredients. It bakes up beautifully in less than 30 minutes, and it tastes AMAZING. Perfectly sweet with a serious banana flavor.
I almost made just a regular cream cheese frosting. Which would have been good, I’m sure. But chocolate was for sure the right call to go with banana. Although… isn’t chocolate always the right call??
I hope you enjoy every bit of this cake as much as we did!
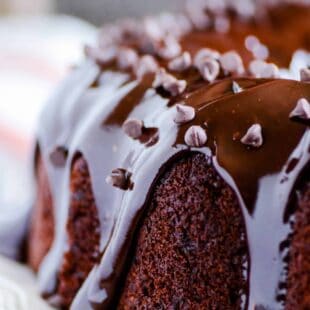
Rich and moist chocolate zucchini cake with chocolate chips and a decadent chocolate ganache on top!
Today, we’re revisiting one of my oldest recipes. And one of my very favorites. Because (aside from my favorite chocolate cake) I’ve yet to meet another chocolate cake that rivals this chocolate zucchini cake in terms of flavor, texture, and moistness. Plus, we’re talking about FOUR layers of chocolate goodness here:
???? chocolate cake.
???? chocolate chips inside the cake.
???? chocolate ganache.
???? more chocolate chips on top of the ganache.
This is a MAJOR chocolate experience you guys.
And the best part is: you’re totally getting in your veggies! Not that you’ll even notice.
You won’t believe there are TWO WHOLE zucchinis in there! And you know what they say– you need 5 servings of fruits and vegetables a day. So, basically, that means you need 2 and a half cakes per day. Which seems reasonable. Amiright? ????
That ganache is practically a superfood on it’s own.
I mean, just look at that! Does anyone else get all ???? ???? ???? watching ganache drip down the side of a cake? Be still my heart!
Ganache is so simple to make. I actually wrote a whole post about it here (which I plan to update soon, in fact. But it’ll do for now). It just takes two simple ingredients: chocolate and heavy cream. I usually nuke it in the microwave in 30 second increments until everything is warm and melty and stirs smooth. But it’s probably a little safer to make it over medium heat on the stove top if you don’t work with chocolate much, just to avoid burning or seizing it.
This cake is seriously a dream come true. You are going to be obsessed with it!!
These White Chocolate Rice Krispies Treats with M&Ms are super easy, gooey rice krispie treats with M&MS and a white chocolate drizzle.
Since the beginning of summer vacation, my kids and I have been on a major rice krispie treat kick. We buy the mega box at Sam’s club, and lasts us about a week (although, I suspect my husband is going through them faster than the kids are).
Basically, we really heart rice krispie treats.
And this is the MacDaddy recipe of them all. Insane gooey-ness. M&Ms. And a white chocolate drizzle on top. These White Chocolate Rice Krispies Treats with M&Ms are my hands down favorite rice krispie treat of all time (and that includes, Biscoff RKT, Toasted Marshmallow RKT, and Butterfinger Butterscotch RKT— all of which are hard to beat).
There is something about this flavor and texture combo that is just so right, know what I mean?
If you like rice krispie treats, you are going to flip for these! Added bonus: *NO BAKING*
Because it is waaaaaaaaaay too hot for that nonsense. Turn off the oven and dig into these instead! Woot!
Making White Chocolate Rice Krispies Treats with M&Ms
Making White Chocolate Rice Krispies Treats with M&Ms is a simple and fun way to create a colorful, sweet snack that’s perfect for any occasion. Start by melting together butter and miniature marshmallows in the microwave, stirring until the mixture is smooth and creamy. This step takes just a few minutes, and the gooey marshmallow blend will form the sticky base that holds the treats together.
Once the marshmallows are fully melted, mix in the Rice Krispies cereal, ensuring that each piece is evenly coated. The key to adding the M&Ms is to fold them in gently—this helps prevent the candies from cracking or the chocolate from melting too much, preserving the bright, festive look of your treats.
After the mixture is ready, press it gently into a parchment-lined or well-greased 9×9 baking dish. It’s important not to press too hard, as you want the treats to remain light and chewy. Allow the mixture to cool for about 30 minutes, or until it’s firm to the touch and no longer warm.
Once set, cut the treats into bars and drizzle them with melted white chocolate for an extra layer of sweetness. For a final touch, top with additional M&Ms to make your treats even more vibrant and fun. These White Chocolate Rice Krispies Treats with M&Ms are not only easy to make but also a hit with both kids and adults alike!
Moist chocolate donuts that are baked instead of fried, topped with a sweet glaze and Oreo crumbles.
Happy Thursday! It’s almost the weekend, which I think calls for donuts!!
I’m obsessed with donuts. Cream filled, chocolate frosted, sprinkled, glazed, baked, fried, whatever. If it’s a donut, I want it. These baked chocolate donuts with a glaze have an especially soft spot in my heart. I love the texture– they’re a little bit crispy around the edges, just like a fried donut, but soft and airy on the inside. So much perfection in one little breakfast food!
Today, I’m taking my favorite chocolate donut recipe, and cranking it up a notch by coating the glaze in Oreo cookie crumbles and adding a drizzle of cream cheese frosting to top it all off.
These donuts are incredibly simple to make. The ingredients are simple and straightforward, stuff you have on hand. And the mixing and baking process is a breeze as well. Basically, what I’m saying is that you can have homemade chocolate donuts in about 20 minutes.
Which I think we can agree is something we allllllllll need. ????
This is THE PERFECT no churn ice cream recipe thanks to a secret ingredient. It’s just two ingredients (like the other famous no churn recipe), but this one has a way better texture, and it’s not overly sweet! It seriously tastes and feels JUST LIKE real ice cream.
YOU GUYS!!
I am so so so so sososososoooooooooooooooooo crazy excited to share this recipe with you today.
Did I mention I’m pretty pumped?? I’m SO pumped.
Why? Because I FINALLY have a two-ingredient, no-churn (read no machine required!) homemade ice cream that really, truly, 1000% tastes like ice cream. Really!
Have you ever made 2-ingredient, no churn ice cream like this? It’s fine. I mean, I liked it well enough when I thought that was all there was. That you couldn’t make anything better with just two ingredients and no ice cream machine. Back when I thought you had to settle for an overly-sweet-sort-of-weird-texture kind of ice cream. Back when that was all there was, it was good enough. It was maybe even kind of great.
But ohhhhhhhhhh, how wrong I was, my friends.
It turns out there is so much more to no-churn ice cream life than we thought there was!!
Okay, so what were the problems with the old recipe? Primarily two things: 1) it was WAY too sweet. Especially if you used the Cool Whip shortcut (guilty). And 2) it had sort of a weird texture as it melted. Because it never really melted down to a liquid… it was more of a semi-solid. Which was weird.
How do we fix that?
Well, for starters, we need an ingredient that balances out the sweet from the sweetened condensed milk. And secondly, we probably don’t need to add another thick ingredient like whipped cream!
Enter the magical secret ingredient: SOUR CREAM.
The answer was there the whole time! So unassuming and subtle, just sitting there in the refrigerator waiting for us to notice. Waiting for us to realize that when sour cream mixes with sweetened condense milk and freezes…. BAM. Ice cream! And not just any ice cream– good ice cream.
Way good ice cream, you guys.
Want to know what else is cool about this recipe?? You can actually substitute nonfat Greek yogurt in place of the sour cream. YES!!!! Isn’t that amazing?
Be forewarned, it does get ever-so-slightly (and I do mean only slightly) icier than the version with sour cream. But still– I think that’s totally worth it for an easy homemade frozen yogurt that does actually have some nutritionally redeeming qualities, amiright?!
So, what do you think? Is anyone else as excited about this revolutionary recipe as I am?? Because I’m literally still flipping out over this. I want to go make eleventy bajillion flavors of no churn right now. Imagine the possibilities now that easy homemade ice cream doesn’t suck! WOOT!