Rich fudgy brownies that taste like your favorite Thin Mint Girl Scout Cookies!

Thin Mint Brownies Recipe

Rich fudgy brownies that taste like your favorite Thin Mint Girl Scout Cookies!

This post is sponsored by Pillsbury.

Rich fudgy brownies that taste like your favorite Thin Mint Girl Scout Cookies!

Top 5 things I learned in Girl Scouts:

  1. Be careful when hot gluing pennies to hair clips. ????
  2. Send the cookie order form to work with your Dad immediately upon receiving the form.
  3. Show up to meetings twinning with your best friend. With a matching side braid if possible.
  4. Surprisingly, moving up to ‘Brownies’ doesn’t mean you actually get brownies. Who knew?
  5. Always, always, ALWAYS stash the Thin Mints in the freezer as soon as the shipment gets in!

Rich fudgy brownies that taste like your favorite Thin Mint Girl Scout Cookies!

Is there anything in this world better than frozen Thin Mints?!

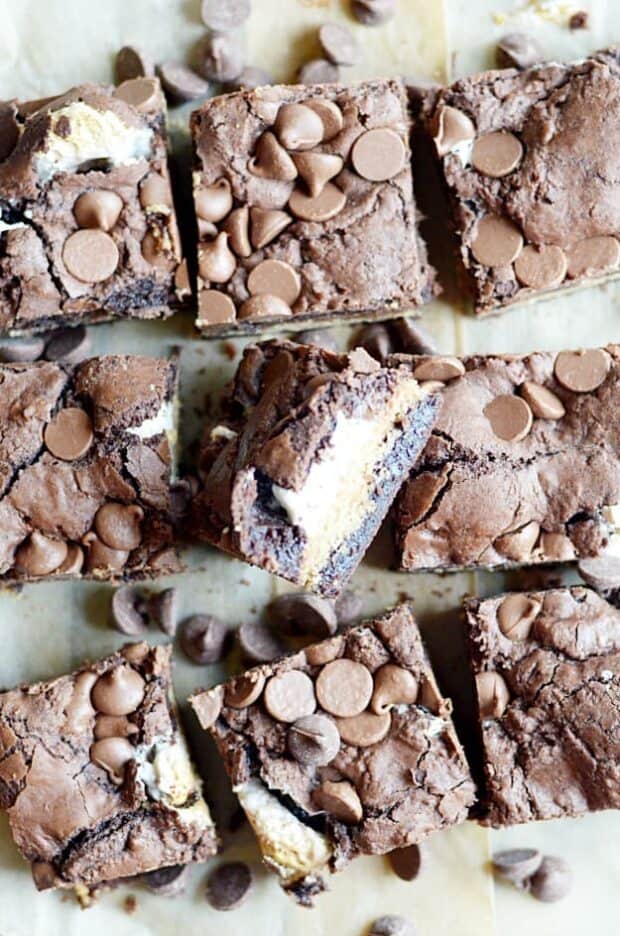
How about a frozen Thin Mint Brownie?

You guys… THIN MINT BROWNIES! And I don’t mean Thin-Mint-Brownies-that-you-have-to-wait-all-the-way-until-Girl-Scout-Cookie-season-to-make.

I mean whip-em-up-brownies made RIGHT NOW with a whisk and a bowl in your very own kitchen with just 4 simple ingredients. Interested?

Rich fudgy brownies that taste like your favorite Thin Mint Girl Scout Cookies!

Of course you are. Aren’t we all?!

The NEW Pillsbury™ Girl Scout Cookie™- Inspired Baking Mixes provide a way to recreate the crave-worthy flavors of Girl Scout Cookies® at home in the form of brownies, blondies and cupcakes with the ease of a convenient Pillsbury™ Girl Scout Cookie™ Flavored Baking Mix.

I mean, really. It’s about time somebody came up with this! amiright??

Rich fudgy brownies that taste like your favorite Thin Mint Girl Scout Cookies!

Rich fudgy brownies that taste like your favorite Thin Mint Girl Scout Cookies!

I think you’ll love these brownies no matter when you eat them. But my personal opinion is that you should really wait until they’ve cooled completely and given the flavors time to marry a bit before you dig in.

And if you really want them at their very best… just remember Girl Scout Lesson #5. ????

Enjoy! And big thanks to Pillsbury for sponsoring this post.

These moist and ultra fudgy chocolate zucchini muffins are so good. You'll never believe they're full of vegetables!

Triple Chocolate Zucchini Muffins Recipe

These moist and ultra fudgy chocolate zucchini muffins are so good. You’ll never believe they’re full of vegetables!

These moist and ultra fudgy chocolate zucchini muffins are so good. You'll never believe they're full of vegetables!

My CJ is a muffin fiend. It is the only bread I can get him to eat. He won’t touch sandwich bread, buttery soft rolls, fluffy buttermilk pancakes… turns up his nose at all of it.

Don’t ask me how he knows the difference between a muffin and a cupcake, but he does. And apparently the appeal of the cupcake doesn’t even come close to how he feels about muffins. I guess I should feel pretty good about that… but really it just makes me wonder, is he really mine??

I suppose the 25 hours of grueling labor it took to bring him into the world should be enough proof, but his carb snobbery seriously has me questioning things.

These moist and ultra fudgy chocolate zucchini muffins are so good. You'll never believe they're full of vegetables!

These muffins take a big step toward bringing our two worlds together, because these chocolate zucchini muffins really are BETTER than cupcakes. They are ridiculously soft, so fudgy, and utterly indulgent.

You’d never believe that there’s a cup and a half of shredded veggies in there.

So sneaky! ????

My other secret ingredient? Pudding mix!

You know how it makes cakes crazy stupid soft and moist? It does the same thing in muffins.

These moist and ultra fudgy chocolate zucchini muffins are so good. You'll never believe they're full of vegetables!

Did I mention that these freeze really well? They do! So when you’re up to your eyeballs in zucchini this summer, make a double (or triple!) batch of these to stash in the freezer. And just set them out at room temp to thaw when you are ready to dig in.

Enjoy!

Fudgy chocolate brownie bites layered in cool, creamy peanut butter mousse. You won't believe how good this is and how easy it is to make!!

Peanut Butter Brownie Trifles Recipe

Fudgy chocolate brownie bites layered in cool, creamy peanut butter mousse. You won’t believe how good this is and how easy it is to make!!

Fudgy chocolate brownie bites layered in cool, creamy peanut butter mousse. You won't believe how good this is and how easy it is to make!!

I’m all about the easy in the summer time, let me tell you.

Part of me kind of thought that summer might be a little easier than the school year. I mean, I knew it would be challenging having both kids home all day every day. But I guess I still thought that just maybe I would feel like I had more hours in the day to get stuff done.

Since I figured the days would feel longer and all.

Turns out, I was part right. And part so, so, so very wrong. I’m sure you can see where I’m going with this… the days are NEVER ENDING. Never, ever ending. And yet somehow, there don’t seem to be enough hours in the day to get everything done.

WTH? If someone figures that math out, let me know.

Fudgy chocolate brownie bites layered in cool, creamy peanut butter mousse. You won't believe how good this is and how easy it is to make!!

In the meantime, I’m doing lots of quick-and-easy around here. I average cooking a real meal about once a week. Cleaning just doesn’t get done. And I let the kids pretty much rule the roost all day.

Seriously. As I sit here and type, I can see a (LARGE) milk puddle in the carpet that I haven’t sponged up since lunch time (that’s gonna be fun), CJ is rubbing in applesauce on the rug at my feet, clothes and knick knacks and what nots litter every inch of living space as far as the eye can see, my empty fast food cup of soda is leaving a water ring on the table to my left, and there’s a sticky bottle of infant’s Ibuprofen stuck to a book on my right. I still don’t know what we’re having for dinner, Chris will be home in about 15 minutes, and then I’m leaving for a baby shower.

I’m not complaining. But at some point… the situation does become comical.

So when it comes to prepping recipes for the blog? It’s gotta be EASY. We’re talking the minimum amount of effort here.

Fudgy chocolate brownie bites layered in cool, creamy peanut butter mousse. You won't believe how good this is and how easy it is to make!!

And friends, it does NOT get any easier than this recipe for Peanut Butter Brownie Parfaits.

You’ll need pudding mix, peanut butter, Cool Whip, and milk for the mousse part. And you’ll layer that with brownie bites (home baked or store bought, box mix or from scratch, my recipe or yours, WHATEVER) and chocolate chips.

Guys, this recipe is the very definitely of minimal effort. And it’s SO GOOD. And it looks so fancy too. People will never know that you whipped this up whilst standing in a pile of smushed grapes and animal crackers in your yoga pants!

…not that I did that or anything. ????

One bowl, no mixer, no chill time, NO FUSS chocolate chip cookies. This recipe calls for melted butter, so all you need is a sturdy spoon and a bowl for fresh cookies right out the oven in under 15 minutes!

Quick & Easy Chocolate Chip Cookies Recipe

One bowl, no mixer, no chill time, NO FUSS chocolate chip cookies. This recipe calls for melted butter, so all you need is a sturdy spoon and a bowl for fresh cookies right out the oven in under 15 minutes!

One bowl, no mixer, no chill time, NO FUSS chocolate chip cookies. This recipe calls for melted butter, so all you need is a sturdy spoon and a bowl for fresh cookies right out the oven in under 15 minutes!

I’ve had several readers mention to me recently that they miss the chocolate chip cookie experiment.

And you know what? I do too.

You guys know that warm, fresh chocolate chip cookies right out of the oven are my very favorite dessert in the world.  Donuts, pancakes, yellow cake with chocolate frosting, and homemade bread all have a special place in my heart. But nothing, NOTHING, ever beats out a warm and gooey chocolate chip cookie in my book. Ever.

One bowl, no mixer, no chill time, NO FUSS chocolate chip cookies. This recipe calls for melted butter, so all you need is a sturdy spoon and a bowl for fresh cookies right out the oven in under 15 minutes!

In doing the chocolate chip cookie experiment, I’ve found several recipes that I’ve really loved and have made on several different occasions. But last weekend when I was craving my favorite cookie, I didn’t feel like doing my usual 10-second increments and rotations in the microwave to speed soften the butter to the exact perfectness of room temperature.

Annnnnd I just didn’t feel like dirtying up the KitchenAid mixer and dough paddle that I would have to hand wash. I was just feeling that lazy.

But I really did want cookies.

So I did some online research looking through cookie recipes that called for melted butter with no chill time, and patch-worked together my own version.

One bowl, no mixer, no chill time, NO FUSS chocolate chip cookies. This recipe calls for melted butter, so all you need is a sturdy spoon and a bowl for fresh cookies right out the oven in under 15 minutes!
This is butter straight from the fridge after 45 seconds in the microwave. It’s 90% melted, but some of the butter is still retaining a solid form (albeit very soft).

Typically, you don’t melt the butter in a cookie recipe unless you plan to chill the dough before baking, because the cookies will spread all over the baking sheet into a flat mess.

Which is what I fully expected to pull out of the oven when I experimented with the first batch of this recipe. But instead, when I opened the oven door, I found thick, puffy, PERFECT cookies! I made the recipe two more times, just to be sure it wasn’t a fluke. And every single time, I’ve been rewarded with the same results.

One bowl, no mixer, no chill time, NO FUSS chocolate chip cookies. This recipe calls for melted butter, so all you need is a sturdy spoon and a bowl for fresh cookies right out the oven in under 15 minutes!

Using melted butter and getting to forego the chill time speeds up the cookie making process considerably. And it eliminates a couple of extra dishes that can’t be tossed in the dishwasher (if you usually use a KitchenAid mixer or similar like I do).

It’s literally as simple as microwaving the butter, add the rest of the ingredients to the bowl, and stirring with a spoon. Which takes all of maybe 5 minutes. Pop ’em in the oven for 9 more, and ta-da! It’s cookie time!!

I’m in love with this recipe. It might be my favorite yet, just for the simplicity of it.

However, I’m dying to know how it works in YOUR kitchen! It seems like every oven does things a little differently, and I’m wondering if anyone will make these and find that they spread out a ton. So I’m going to turn on the comments for this post below, and I’d love for you guys to whip up a batch one of these days and let me know what kind of results you get. ????????????

One bowl, no mixer, no chill time, NO FUSS chocolate chip cookies. This recipe calls for melted butter, so all you need is a sturdy spoon and a bowl for fresh cookies right out the oven in under 15 minutes!

Speaking of favorite recipes… a lot of you have been emailing me wanting to know what the updated favorites are in my quest for the perfect chocolate chip cookie recipe. So here are my latest Top 5:

  1. Today’s Quick & Easy Chocolate Chip Cookies (I can’t help it, I’m so lazy that to me these are just too perfect!)
  2. Chewy Double Chocolate Chunk Cookies
  3. KAF Chocolate Chip Oatmeal Cookies
  4. DoubleTree Hotel Chocolate Chip Cookies
  5. KAF Chocolate Chip Cookies
My mom's famous banana bread muffins made with peanut butter and swirled with Nutella. We didn't have a crumb left!

Peanut Butter Nutella Banana Muffins Recipe

My mom’s famous banana bread muffins made with peanut butter and swirled with Nutella. We didn’t have a crumb left!

My mom's famous banana bread muffins made with peanut butter and swirled with Nutella. We didn't have a crumb left!

If you need me to convince you that peanut butter and Nutella and banana muffins are a match made in heaven.. then you are possibly on the wrong site. ????

My mom's famous banana bread muffins made with peanut butter and swirled with Nutella. We didn't have a crumb left!

People ask me all the time what I do with all the treats I bake. All.the.time.

I guess I should be flattered that people don’t take one look at me and think that I eat every single thing that comes out of my kitchen. But, oh, if they only knew how many of my baked goods never quite make it out the door to all the places I intend to send them.

Well, I’d be horrified. So I’m glad that they don’t know. But what I’m confessing is: I eat a lot of it myself.

Case in point: these muffins.

My mom's famous banana bread muffins made with peanut butter and swirled with Nutella. We didn't have a crumb left!

I took one bite, and I was gone. Or rather… the muffins were gone! ????

Super soft, moist banana bread bursting with peanut butter flavor and swirled with Nutella. A LOT of Nutella. So, so, so, good.

And so comforting! I don’t if it’s just me, but these are all flavors that just make me feel good and cozy on the inside. My mom’s banana bread always makes me feel that way. But adding the peanut butter and the Nutella added to that even just a little bit more.

My mom's famous banana bread muffins made with peanut butter and swirled with Nutella. We didn't have a crumb left!

Of course, OF COURSE, the key to any great banana bread recipe is to use incredibly ripe bananas (how to quickly ripen bananas). Like, almost rotten ripe. I mean, if they’re moldy and leaking… then no. Gross.

But soft and squishy and super brown– YES. Those are exactly the bananas we want in this recipe. Overripe bananas will add a tremendous amount of natural sweetener and moisture to any recipe. So we definitely want them in these.

🍌🍌🍌 CELEBRATE BANANAS with us: our favorite Banana Bread Recipes 🍌🍌🍌

My mom’s recipe that I’m basing this variation on typically calls for a little additional oil. But we’re going to skip that this time, since we’re adding peanut butter which will take care of the fat needed to help keep the bread soft. Plus, it tastes good ????.

My mom's famous banana bread muffins made with peanut butter and swirled with Nutella. We didn't have a crumb left!

When it comes time to swirl in the Nutella, I actually like to step a little outside of the box here. Instead of just adding the Nutella directly to the batter, I actually like to mix it INTO a portion of the batter, and then swirl the Nutella batter into the remaining batter.

Nutella batter = more Nutella taste = better.

These muffins are great warm out of the oven. But like all banana bread recipes, they’re even better at room temp. Something about cooling and sitting for a while really gives the flavors a chance to stand out!

Enjoy!

Ridiculously easy bread that is super crusty on the outside and steamy soft on the inside. You won't believe how fool-proof this recipe is!

Easy Overnight Artisan Bread Recipe

Ridiculously easy artisan bread recipe that is super crusty on the outside and steamy soft on the inside. You won’t believe how fool-proof this recipe is!

Ridiculously easy bread that is super crusty on the outside and steamy soft on the inside. You won't believe how fool-proof this recipe is!

I have been OBSESSED with making homemade bread recently. Which is a little weird (and HOT!) for summertime, I know… but is homemade bread ever really out of season??

I actually have two different recipes I want to share with you, but for today– this Overnight Artisan Bread is what I’ve been making most frequently. And it’s been worth turning on the hot oven in the middle of June, I promise!

Ridiculously easy bread that is super crusty on the outside and steamy soft on the inside. You won't believe how fool-proof this recipe is!

Aside from the crusty outside and heavenly soft insides, there’s something else I really, really like about this bread.

It is SO EASY to make. And I mean, SOOOOOOOOOOO easy. You don’t need a mixer at all, in fact, you don’t even have to knead the dough! Just stir it with a spoon, and then cover it up to do it’s thing overnight.

Ridiculously easy bread that is super crusty on the outside and steamy soft on the inside. You won't believe how fool-proof this recipe is!

Yep– overnight!

That’s the other thing I love about this recipe. With most yeast breads, you have to be realllllly careful of the rising time. You always have to make sure that it rises just right— not too much or it will fall, and not too little or it won’t be soft and puffy. Which means, you usually have to be around to babysit the dough for an hour or two.

But not this artisan bread recipe! Mix up the dough (and let’s review here– no mixer and no kneading!), and then let it just sit on the counter overnight. It can rest at room temp for 12-18 hours!! That’s a whole lot of time that you DON’T need to babysit dough.

Ridiculously easy bread that is super crusty on the outside and steamy soft on the inside. You won't believe how fool-proof this recipe is!

Ok, so next up…. I didn’t get a picture of this part, but it’s not hard to describe:

After the 12-18 hours of rising, the dough will be puffed up in the bowl. Don’t worry, it shouldn’t look smooth and round like typical bread dough. It will be sticky and pocked, and it should be pretty much level and flat.

Use floured hands to grab the dough out of the bowl and gently form into a round disc. Loosely wrap the dough in plastic or a bread towel while the oven is preheating.

Ridiculously easy bread that is super crusty on the outside and steamy soft on the inside. You won't believe how fool-proof this recipe is!

Once the oven and the pot have preheated, place the dough in the pot, cover, and start baking. Baking the bread in a dutch oven (or any covered pot that is oven safe up to 450ºF) is what makes this bread taste so special! The steam from baking in a covered pot bakes the inside of the bread to soft perfection, and it’s also responsible for making an incredible crust on the outside.

Steam is like the secret weapon of bread-making. It does magical things. ????

Once the bread cools (if you can wait that long before digging in), slice it up and serve it with pretty much anything! It makes fabulous sandwiches, incredible french toast, and even makes for a classy dinner bread on the side.

Enjoy!

Creamy, sweet, unbelievably honey butter with a heavy touch of cinnamon. Just like the stuff you'll find at Texas Roadhouse!

Texas Roadhouse Cinnamon Honey Butter Copycat Recipe

Creamy, sweet, unbelievably honey butter with a heavy touch of cinnamon. You’ll love this Texas Roadhouse Cinnamon Honey Butter copycat recipe I put together!

Creamy, sweet, unbelievably honey butter with a heavy touch of cinnamon. Just like the stuff you'll find at Texas Roadhouse!

You’ve been to Texas Roadhouse right?

And you’ve inhaled a basket of their rolls smothered in this ridiculous cinnamon honey butter right?

If you haven’t, stop what you’re doing right now, and GO. It’s ok. I’m not going anywhere. I can wait.

Creamy, sweet, unbelievably honey butter with a heavy touch of cinnamon. Just like the stuff you'll find at Texas Roadhouse!

Ok, AH-mazing, right?! Like, the best thing that’s happened to fresh, warm, yeasty bread E-V-E-R.

And the best part is (who am I kidding?! the best part is how good it tastes!! But the NEXT best part is…) how easy this copycat version of Texas Roadhouse Cinnamon Honey Butter is to make at home. It tastes EXACTLY the same. And you get a whole lot more than the tiny little scoop they give you at the restaurant.

Because we obviously need more butter than that!!

First, you’ll need softened butter. Whip it into oblivion. Then add honey, cinnamon, and powdered sugar.

Creamy, sweet, unbelievably honey butter with a heavy touch of cinnamon. Just like the stuff you'll find at Texas Roadhouse!

And I like a little pinch of sea salt too, just to cut through all that sweet.

Creamy, sweet, unbelievably honey butter with a heavy touch of cinnamon. Just like the stuff you'll find at Texas Roadhouse!

Creamy, sweet, unbelievably honey butter with a heavy touch of cinnamon. Just like the stuff you'll find at Texas Roadhouse!

Your waistline isn’t going to thank me for this, I won’t lie. But your tastebuds most certainly will!

Enjoy this Texas Roadhouse Cinnamon Honey Butter responsibly!

Four simple ingredients and 10 minutes at the stove is all that stands between you and this creamy, dreamy homemade lemon curd!

Homemade Lemon Curd Recipe

Four simple ingredients and 10 minutes at the stove is all that stands between you and this creamy, dreamy homemade lemon curd recipe!

Four simple ingredients and 10 minutes at the stove is all that stands between you and this creamy, dreamy homemade lemon curd!

You guys. Is there seriously a less appetizing word out there than CURD? I mean, really. ????

But rest assured, for a word that so closely resembles curdled and cheese curds, this dreamy homemade lemon curd recipe is nothing of the sort.

If lemon is your thang and you’ve already made Ina’s Lemon Bars, Lemon Poke Cake, Lemon Berry Scones, Lemon Blueberry Sweet Rolls, and Lemon Poppyseed Banana Bread… then it is time to make your own lemon curd, my friends.

🍋🍋🍋 Celebrate LEMONS with us in this roundup of our best LEMON DESSERTS! 🍋🍋🍋

Four simple ingredients and 10 minutes at the stove is all that stands between you and this creamy, dreamy homemade lemon curd!

This recipe is so ridiculously easy. Four simple ingredients is all you’ll need:

  • sugar
  • lemon juice
  • egg yolks
  • butter

What You Need

Now, a lot of recipes will have you making this over a double boiler. This supposedly prevents any egg lumps in the mixture. I don’t own a double boiler, and frankly, I don’t have room for anything else in the pots and pans and bowl department in my little kitchen. So, I didn’t use a double boiler.

And it was just fine.

I cooked my curd over medium-high heat and stirred it constantly (just like you would have to do with a double boiler anyway). Well, I did end up with a few little lumps, but nothing that wasn’t easily strained through a small sieve.

Four simple ingredients and 10 minutes at the stove is all that stands between you and this creamy, dreamy homemade lemon curd!

I feel like I’ve read a million times, “no straining required!” “no sieve needed!” like it’s such a hassle to strain the curd. But really, it’s just not a big deal at all.

Pour the mixture through the sieve over the container you plan to store it in. The curd passes through, and the lumps stay out. Easy peasy. And you can buy a small sieve for less than ten bucks at any superstore.

Seriously. Just buy the sieve. Use it. Save yourself a headache. It’s not a big deal. And it makes this process so much easier and keeps that lemon curd smooth and creamy!

Four simple ingredients and 10 minutes at the stove is all that stands between you and this creamy, dreamy homemade lemon curd!

Ok, so now that we’ve talked about how to make it… what exactly is lemon curd? And how do you use it??

Lemon curd is sort of like the filling in a lemon meringue pie. It’s sweet and tart and creamy.

And what to use it on? How about everything.

Spread over Pancakes.

Fill donuts.

With crepes.

Mix it with granola and yogurt.

On strawberry shortcake.

Or, my personal favorite, serve spoon it over angel food cake and top with berries and whipped cream! This is such a yummy summertime treat. And the berries compliment the sweet of the curd, while the whipped cream balances the tart, and the cake soaks it all up.

Four simple ingredients and 10 minutes at the stove is all that stands between you and this creamy, dreamy homemade lemon curd!

No matter how you use it, you really can’t go wrong with homemade lemon curd! Enjoy 🙂

Chewy, fudgy brownie cookie bars with a marshmallow swirl, and graham cracker crust layer, and semi-sweet chocolate chips.

Nutella Brownie S’mores Cookie Bars Recipe

Chewy, fudgy brownie cookie bars with a marshmallow and Nutella swirl, graham cracker crust layer, and milk chocolate chips.

Chewy, fudgy brownie cookie bars with a marshmallow swirl, and graham cracker crust layer, and semi-sweet chocolate chips.

If you’ve been hanging around Something Swanky for any amount of time at all really, you know my love of these brownie cookies. And if you’ve been stopping by for a little longer than that, then you also know that I’m obsessed with s’mores.

Bringing the two together was simply the natural progression of things.

Chewy, fudgy brownie cookie bars with a marshmallow swirl, and graham cracker crust layer, and semi-sweet chocolate chips.

Ok, so… Brownie Cookie Bars. You may be wondering why I took brownies and turned them into cookies and then took those cookies and turned them back into bars. Yeah?

And the answer is… I wanted something a little firmer than brownies, like a cookie, but still basically brownies. Ergo: my favorite brownie cookie recipe baked into bars.

So, yeah. They’re basically still brownies. A little firmer on the tops and bottoms than a brownie, but still just as rich and fudgy in the centers. I know it’s a little backwards, but just trust me on this. It works.

Chewy, fudgy brownie cookie bars with a marshmallow swirl, and graham cracker crust layer, and semi-sweet chocolate chips.

Speaking of centers… would you get a load of that?! ????

Sandwiched in between these rich and fudgy brownie cookie bars is a thick and gooey layer of marshmallow cream, Nutella, and a ridiculously perfect, buttery graham cracker crust.

YES. All that. ????

Chewy, fudgy brownie cookie bars with a marshmallow swirl, and graham cracker crust layer, and semi-sweet chocolate chips.

These are so, so, SO easy to make. You’ll only need one bowl– and you can make the graham cracker crust layer in a ziplock bag like I did, so there aren’t even any extra dishes needed there!

Starting with the brownie cookie dough. It’s simply a variation on a box mix recipe. You will need an actual box mix, but don’t follow the recipe on there for brownie batter. I’m giving you a different set of ingredients and measurements that will create a different texture than what you’d get using the recipe on the box. More cookie-like, remember?

Next up, a dreamy graham cracker crust. I ALWAYS make graham crusts in a bag. It’s so much easier, less mess, less fuss, so it really just makes sense. Place the graham crackers in a gallon-sized zip bag and crush them up using a rolling pin until they are fine crumbs. Toss in the butter and sugar, and then nuke the whole bag for about 30-60 seconds, until the butter melts. After that, all you have to do is mush the mixture in the bag until the crust comes together! Dump it out over the brownie layer and press it down, easy peasy.

The marshmallow cream and Nutella layer is probably the hardest part, because they’re both so sticky. But if you have a release ice cream or cookie scoop, that pretty much solves all your problems. I just scoop on what I need and spread it just a little with an offset spatula.

Add some more brownie cookie to the top and your milk chocolate chips, and…

Bake.

Drool.

And then top with ice cream.

Chewy, fudgy brownie cookie bars with a marshmallow swirl, and graham cracker crust layer, and semi-sweet chocolate chips.

Obviously.

This quick and easy mousse looks fancy, but it's actually SO quick and easy to make!

White Chocolate Snickerdoodle Pudding Mousse Recipe

This quick and easy mousse looks fancy, but it’s actually SO quick and easy to make!

This quick and easy mousse looks fancy, but it's actually SO quick and easy to make!

This easy version of mousse has long since been one of my favorite go-to desserts. Not only is it delicious, but it’s super duper quick and easy, cheap, fairly diet friendly, and really versatile. There are so many different ways to make it! Plus, I almost always have all the ingredients on hand, so it’s a great recipe to keep in your back pocket for dessert in a pinch.

If that’s not a win all over, then I don’t know what is!

This quick and easy mousse looks fancy, but it's actually SO quick and easy to make!

The ingredient list is pretty simple. And really short.

Instant pudding mix (white chocolate flavored for this snickerdoodle variation).

Fat free milk.

8 ounces Cool Whip.

And for this version you’ll also need cinnamon, white chocolate, and (optional) snickerdoodle cookies.

This quick and easy mousse looks fancy, but it's actually SO quick and easy to make!

White chocolate and cinnamon is one of my all-time favorite flavor combinations. If you love it as much as I do, you MUST make these White Chocolate Snickerdoodle Pudding Cookies and these White Chocolate Covered Pretzel Snickerdoodles. They’re both ah-mazing!

But when you don’t have time for cookies, this mousse will do the trick ????.

This quick and easy mousse looks fancy, but it's actually SO quick and easy to make!

Enjoy!

And PS- if you want an easy way to make sweet chocolate curls like I did, use this tutorial from I Am Baker. It made chocolate curling a breeze!

Deep, dark chocolate brownie cookies loaded with chocolate chunks and milk chocolate toffee bits. Crackly tops, fudgy centers, and chewy edges.

Toffee Chunk Brownie Cookies Recipe

Deep, dark chocolate brownie cookies loaded with chocolate chunks and milk chocolate toffee bits. Crackly tops, fudgy centers, and chewy edges.

Deep, dark chocolate brownie cookies loaded with chocolate chunks and milk chocolate toffee bits. Crackly tops, fudgy centers, and chewy edges.

I first published this recipe almost exactly 6 years ago. And while it was a delicious idea at the time, I’ve learned a lot about baking cookies in the past 6 years and felt like it was time for this recipe to evolve a bit.

I wanted fudgier centers, chewier edges, and even more chocolate chunks and toffee bits than the first version had. I also wanted crackly tops, just like brownies have.

So of course I turned to my FAVORITE brownie mix cookie base recipe.

Deep, dark chocolate brownie cookies loaded with chocolate chunks and milk chocolate toffee bits. Crackly tops, fudgy centers, and chewy edges.

Deep, dark chocolate brownie cookies loaded with chocolate chunks and milk chocolate toffee bits. Crackly tops, fudgy centers, and chewy edges.

Just look at that gooey cookie dough! It’s dreamy. Like fudge. Or brownie batter, since that’s basically what it is. Honestly. I could an entire bowl of just the dough.

This recipe makes THEE best chocolate cookies. And the recipe is really so simple. All you need is a brownie mix and a few simple ingredients that I’m sure you already have on hand (besides the chocolate chunks and toffee, be sure to pick those up if you don’t stock up like I do ????).

You won’t even need a mixer for these. One bowl, one spoon, badda bing, badda boom.

Deep, dark chocolate brownie cookies loaded with chocolate chunks and milk chocolate toffee bits. Crackly tops, fudgy centers, and chewy edges.

Pull up a big glass of cold milk and get ready to enjoy yourself. These cookies are 100% chewy, fudgy, and everything that’s right in the world.

Thick and chewy snickerdoodles are so easy to make from scratch! These are warm and fresh from the oven in less than 25 minutes.

Thick and Chewy Snickerdoodles Recipe

Thick and chewy snickerdoodles are so easy to make from scratch! These are warm and fresh from the oven in less than 25 minutes.

Thick and chewy snickerdoodles are so easy to make from scratch! These are warm and fresh from the oven in less than 25 minutes.

These are the softest, dreamiest, buttery, pillowy snickerdoodles on the planet.

Have I tried all the snickerdoodles on the planet? Well, no. But it’s really hard to imagine that there are any out there better than these.


Thick and chewy snickerdoodles are so easy to make from scratch! These are warm and fresh from the oven in less than 25 minutes.

I use two very special ingredients to make these so good.

It’s a little out of the common way in a cookie recipe, but this first special ingredient makes a big difference: egg yolks. ONLY egg yolks. THREE egg yolks, to be precise. ????

I really don’t like cake-y snickerdoodles. I feel like they dry out super fast, which makes them good for only the day of. Using three egg yolks and none of the whites solves this problem. Egg yolks add moisturizing fats and emulsify the dough. They make baked goods fudgier, while egg whites tend to make them cake-y.

I wanted each bite of these cookies to be moist, and soft, and “fudgy,” even days later. So in went the egg yolks! (Save the whites for this Healthy Honey Whole Wheat Banana Bread. SO GOOD!)

Thick and chewy snickerdoodles are so easy to make from scratch! These are warm and fresh from the oven in less than 25 minutes.

The second super star ingredient is…. cream of tartar!

No big surprise there. Most people already know that a fabulous snickerdoodle MUST have cream of tartar. Can you substitute baking powder? Sure. But it won’t be quite the same. Cream of tartar gives these cookies that signature tangy flavor that all great snickerdoodles have.

Thick and chewy snickerdoodles are so easy to make from scratch! These are warm and fresh from the oven in less than 25 minutes.

Side note… see all those cracks around the edges? Don’t worry, that won’t happen to yours. My family kept eating the cookies from the first two batches as they came out of the oven– before I had a chance to photograph them! So the batch you see pictured was made from dough that had been refrigerated for over 24 hours. I forgot to leave them on the counter to thaw before baking, so I smashed them down a bit with a glass before sticking them in the oven (that’s where the cracks came from).

Enjoy!!!

These melt in your mouth cinnamon rolls couldn't be easier thanks to refrigerated crescent roll dough!

Mini Cinnamon Rolls {No Yeast} Recipe

These melt in your mouth cinnamon rolls couldn’t be easier thanks to refrigerated crescent roll dough!

These melt in your mouth cinnamon rolls couldn't be easier thanks to refrigerated crescent roll dough!

These melt in your mouth cinnamon rolls couldn't be easier thanks to refrigerated crescent roll dough!

Three things that I adore in any recipe:

  1. EASY
  2. Mini
  3. Breakfast!!

And when you put them all together in one delicious little cinnamon bun? I’m sold.

These melt in your mouth cinnamon rolls couldn't be easier thanks to refrigerated crescent roll dough!

Everything starts out with a can of crescent roll dough. If you can find the kind that’s not perforated, all the better. But if not (I never can), simply pinch together the seams to form one solid rectangle of dough.

Then sprinkle the whole thing with cinnamon and brown sugar. Unlike regular yeasted cinnamon rolls, we don’t need any butter at this step, because there is already so much butter in the dough itself.

These melt in your mouth cinnamon rolls couldn't be easier thanks to refrigerated crescent roll dough!

These melt in your mouth cinnamon rolls couldn't be easier thanks to refrigerated crescent roll dough!

Roll the dough and slice it up, just like you would regular cinnamon rolls.

If your seams start to break apart a little (you can see mine did), don’t worry about it. Just pinch them together as best you can. These don’t have to be perfectly pretty to be perfectly delicious!

As you can see…

These melt in your mouth cinnamon rolls couldn't be easier thanks to refrigerated crescent roll dough!

Be sure to grease the pan really well before sticking these guys in there. All that brown sugar can really create a sticky situation!

Then bake, frost, and YUM!

These melt in your mouth cinnamon rolls couldn't be easier thanks to refrigerated crescent roll dough!

These melt in your mouth cinnamon rolls couldn't be easier thanks to refrigerated crescent roll dough!

Just look at how gooey these are!

Cinnamon roll perfection in every pop-able bite.

These melt in your mouth cinnamon rolls couldn't be easier thanks to refrigerated crescent roll dough!

Enjoy!

Super rich and fudgy brownies stuffed with Oreos and smothered in vanilla buttercream.

Oreo Brownies with Vanilla Buttercream Recipe

Super rich and fudgy brownies stuffed with Oreos and smothered in vanilla buttercream.

Super rich and fudgy brownies stuffed with Oreos and smothered in vanilla buttercream.

Ultra fudgy brownies. Buttercream piled sky high. Stuffed with Oreos. And topped with an obscene amount of sprinkles and more Oreos.

This is a brownie lover’s dream.

Super rich and fudgy brownies stuffed with Oreos and smothered in vanilla buttercream.

I used my mom’s from-scratch brownie recipe and my favorite homemade buttercream for today’s recipe. And they go together better than peanut butter and jelly ????.

This recipe is so, so easy! But if you really wanted to make it fool proof, you could even use a box brownie mix and store bought frosting. Seriously. Go ahead, I won’t tell. You’ll still end up with outrageously decadent, gorgeous, swoon-worthy brownies.

Super rich and fudgy brownies stuffed with Oreos and smothered in vanilla buttercream.

Super rich and fudgy brownies stuffed with Oreos and smothered in vanilla buttercream.

Once you have the brownie batter mixed up, these come together pretty quickly. Spread about 1/3 of the batter on the bottom of the dish, and then layer the Oreos over that. Pour the rest of the brownie batter on top and spread it out so that all the Oreos are covered. Having brownie batter on both the bottom and top of the Oreos ensures that fudgy goodness will soften up the Oreos a little bit, so that they sort of “melt” into the brownie making it even richer.

I baked my brownies in a 9×13, but you could also bake them a little thicker and use an 8×8 baking dish instead. Just be sure to alter the baking time, they’ll need a little bit longer in the oven. And you’ll probably want to half the buttercream recipe as well.

Or not.

In my house, we all agree that the frosting is the best part…

PicMonkey Collage