This quick and easy mousse looks fancy, but it’s actually SO quick and easy to make!
This easy version of mousse has long since been one of my favorite go-to desserts. Not only is it delicious, but it’s super duper quick and easy, cheap, fairly diet friendly, and really versatile. There are so many different ways to make it! Plus, I almost always have all the ingredients on hand, so it’s a great recipe to keep in your back pocket for dessert in a pinch.
If that’s not a win all over, then I don’t know what is!
The ingredient list is pretty simple. And really short.
Instant pudding mix (white chocolate flavored for this snickerdoodle variation).
Fat free milk.
8 ounces Cool Whip.
And for this version you’ll also need cinnamon, white chocolate, and (optional) snickerdoodle cookies.
Deep, dark chocolate brownie cookies loaded with chocolate chunks and milk chocolate toffee bits. Crackly tops, fudgy centers, and chewy edges.
I first published this recipe almost exactly 6 years ago. And while it was a delicious idea at the time, I’ve learned a lot about baking cookies in the past 6 years and felt like it was time for this recipe to evolve a bit.
I wanted fudgier centers, chewier edges, and even more chocolate chunks and toffee bits than the first version had. I also wanted crackly tops, just like brownies have.
Just look at that gooey cookie dough! It’s dreamy. Like fudge. Or brownie batter, since that’s basically what it is. Honestly. I could an entire bowl of just the dough.
This recipe makes THEE best chocolate cookies. And the recipe is really so simple. All you need is a brownie mix and a few simple ingredients that I’m sure you already have on hand (besides the chocolate chunks and toffee, be sure to pick those up if you don’t stock up like I do ????).
You won’t even need a mixer for these. One bowl, one spoon, badda bing, badda boom.
Pull up a big glass of cold milk and get ready to enjoy yourself. These cookies are 100% chewy, fudgy, and everything that’s right in the world.
Thick and chewy snickerdoodles are so easy to make from scratch! These are warm and fresh from the oven in less than 25 minutes.
These are the softest, dreamiest, buttery, pillowy snickerdoodles on the planet.
Have I tried all the snickerdoodles on the planet? Well, no. But it’s really hard to imagine that there are any out there better than these.
I use two very special ingredients to make these so good.
It’s a little out of the common way in a cookie recipe, but this first special ingredient makes a big difference: egg yolks. ONLY egg yolks. THREE egg yolks, to be precise. ????
I really don’t like cake-y snickerdoodles. I feel like they dry out super fast, which makes them good for only the day of. Using three egg yolks and none of the whites solves this problem. Egg yolks add moisturizing fats and emulsify the dough. They make baked goods fudgier, while egg whites tend to make them cake-y.
I wanted each bite of these cookies to be moist, and soft, and “fudgy,” even days later. So in went the egg yolks! (Save the whites for this Healthy Honey Whole Wheat Banana Bread. SO GOOD!)
The second super star ingredient is…. cream of tartar!
No big surprise there. Most people already know that a fabulous snickerdoodle MUST have cream of tartar. Can you substitute baking powder? Sure. But it won’t be quite the same. Cream of tartar gives these cookies that signature tangy flavor that all great snickerdoodles have.
Side note…see all those cracks around the edges? Don’t worry, that won’t happen to yours. My family kept eating the cookies from the first two batches as they came out of the oven– before I had a chance to photograph them! So the batch you see pictured was made from dough that had been refrigerated for over 24 hours. I forgot to leave them on the counter to thaw before baking, so I smashed them down a bit with a glass before sticking them in the oven (that’s where the cracks came from).
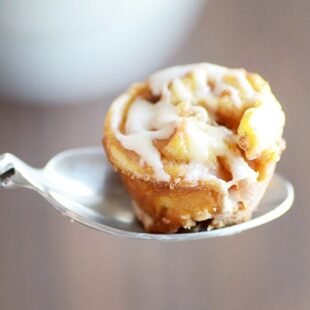
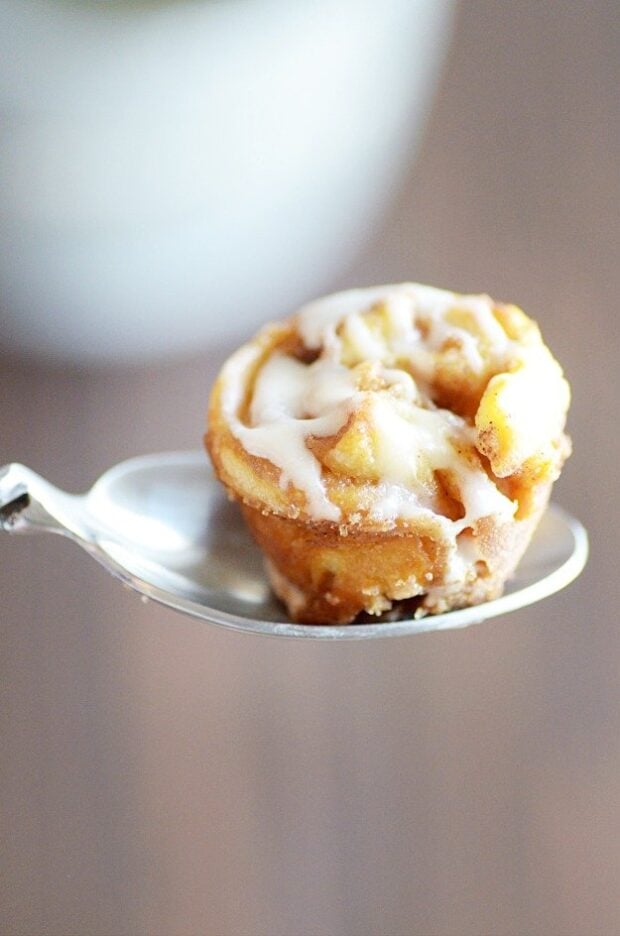
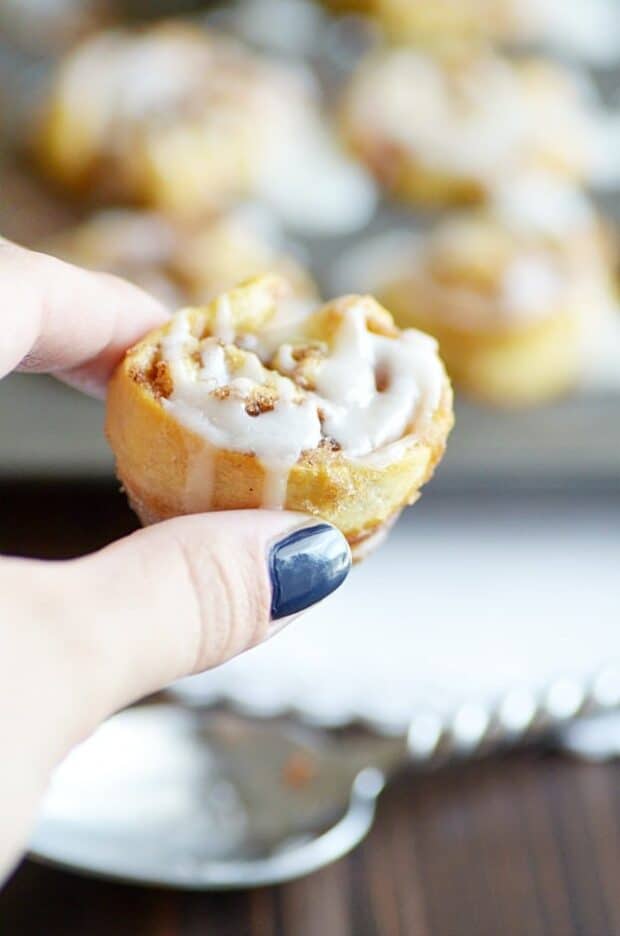
These melt in your mouth cinnamon rolls couldn’t be easier thanks to refrigerated crescent roll dough!
Three things that I adore in any recipe:
EASY
Mini
Breakfast!!
And when you put them all together in one delicious little cinnamon bun? I’m sold.
Everything starts out with a can of crescent roll dough. If you can find the kind that’s not perforated, all the better. But if not (I never can), simply pinch together the seams to form one solid rectangle of dough.
Then sprinkle the whole thing with cinnamon and brown sugar. Unlike regular yeasted cinnamon rolls, we don’t need any butter at this step, because there is already so much butter in the dough itself.
Roll the dough and slice it up, just like you would regular cinnamon rolls.
If your seams start to break apart a little (you can see mine did), don’t worry about it. Just pinch them together as best you can. These don’t have to be perfectly pretty to be perfectly delicious!
As you can see…
Be sure to grease the pan really well before sticking these guys in there. All that brown sugar can really create a sticky situation!
Super rich and fudgy brownies stuffed with Oreos and smothered in vanilla buttercream.
Ultra fudgy brownies. Buttercream piled sky high. Stuffed with Oreos. And topped with an obscene amount of sprinkles and more Oreos.
This is a brownie lover’s dream.
I used my mom’s from-scratch brownie recipe and my favorite homemade buttercream for today’s recipe. And they go together better than peanut butter and jelly ????.
This recipe is so, so easy! But if you really wanted to make it fool proof, you could even use a box brownie mix and store bought frosting. Seriously. Go ahead, I won’t tell. You’ll still end up with outrageously decadent, gorgeous, swoon-worthy brownies.
Once you have the brownie batter mixed up, these come together pretty quickly. Spread about 1/3 of the batter on the bottom of the dish, and then layer the Oreos over that. Pour the rest of the brownie batter on top and spread it out so that all the Oreos are covered. Having brownie batter on both the bottom and top of the Oreos ensures that fudgy goodness will soften up the Oreos a little bit, so that they sort of “melt” into the brownie making it even richer.
I baked my brownies in a 9×13, but you could also bake them a little thicker and use an 8×8 baking dish instead. Just be sure to alter the baking time, they’ll need a little bit longer in the oven. And you’ll probably want to half the buttercream recipe as well.
Or not.
In my house, we all agree that the frosting is the best part…
Chewy, crispy, buttery oatmeal cookies on the outside and delicious dark chocolate on the inside!
Today’s recipe is from waaaaaaaaaaay back in the archives. In fact, I think I remember this being the first recipe I ever posted. I had been blogging for several months by then, but I wasn’t posting recipes up until that point because I was still trying to sell my baked goods via my blog.
I am SO glad I gave up on that dream! Whew!
I get asked all the time “why don’t you just start a bakery?”
Oh, let me count the reasons!! Hm, how about the ridiculous hours, startup costs, needing an actual storefront, either paying employees or burning myself out, having to work out of the house, customer service, and about 8 billion other really valid reasons. But really, it comes down to this… why on earth would I trade the sweetest at-home job on the planet for all that other stuff? And, in all probability, probably make less money doing it!
Yeah, no thank you. I definitely dodged a bullet when I jumped that ship and discovered blogging! And I guess I have to give this recipe some credit for that decision ????. So here you have it– the cookie recipe that employed me as a blogger for the first time!
Ok. So maybe some of you don’t know what a florentine cookie is (I totally didn’t the very first time I stumbled across this recipe, so don’t feel bad), so let’s start with that.
Today’s (American) Florentine cookie has actually drastically evolved from the original European Florentine biscuit, which was made of dried fruit and nuts with a chocolate drizzle. As you’ll see, my recipe uses NO dried fruit and only a handful of chopped almonds to add some crunchy texture. Instead, it’s mostly made up of melted butter, sugar, and oats.
Fortunately, today’s Florentines do still include the chocolate ????. But we’re sandwiching it in between TWO cookies instead of drizzling it on top, because… well, more cookie and more chocolate. Duh.
All versions of this cookie are meant to be thin and lacy with crispy edges and a slightly chewy center. Which is why it’s really important to follow the directions in the recipe exactly and use MELTED butter, and then furthermore, to add the other ingredients to the butter while still over low heat instead of adding the butter to the other ingredients in a separate bowl.
It’s counterintuitive if you do much cookie baking, but keeping the butter warm all the way up until baking will ensure that the cookies spread thin instead of puffing up in the middle like a normal cookie would.
Plus– less dishes ????.
These cookies are so, so yummy. Especially if you’re a texture freak like me!! The chewy centers, crispy edges, crunchy almonds, and chocolate in the center all come together to create like the most perfect cookie sandwich experience ever. EVER!
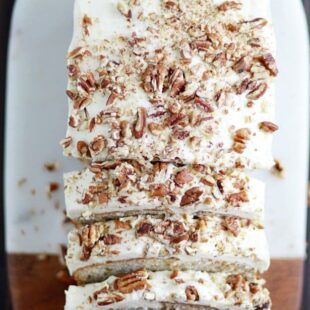
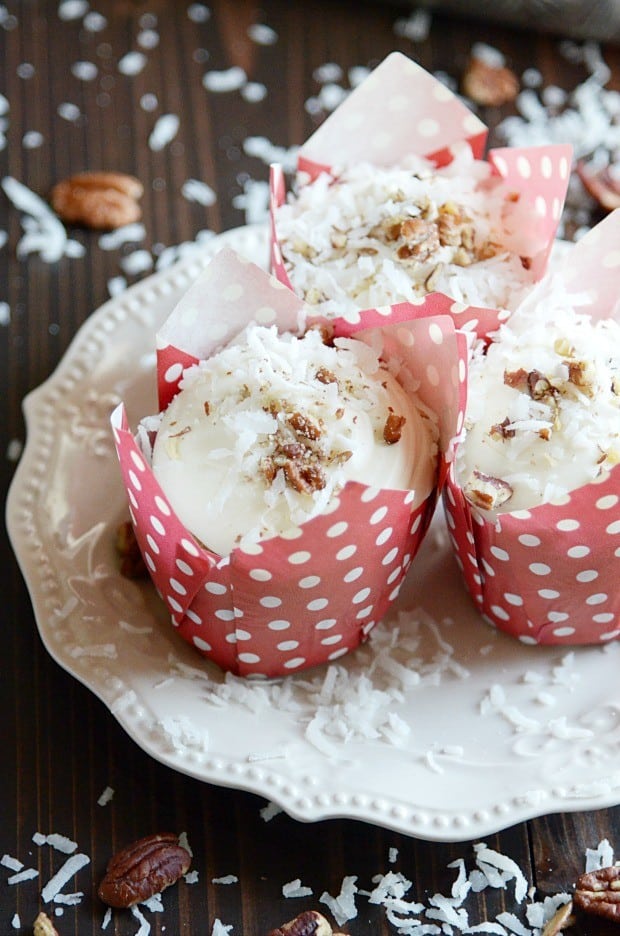
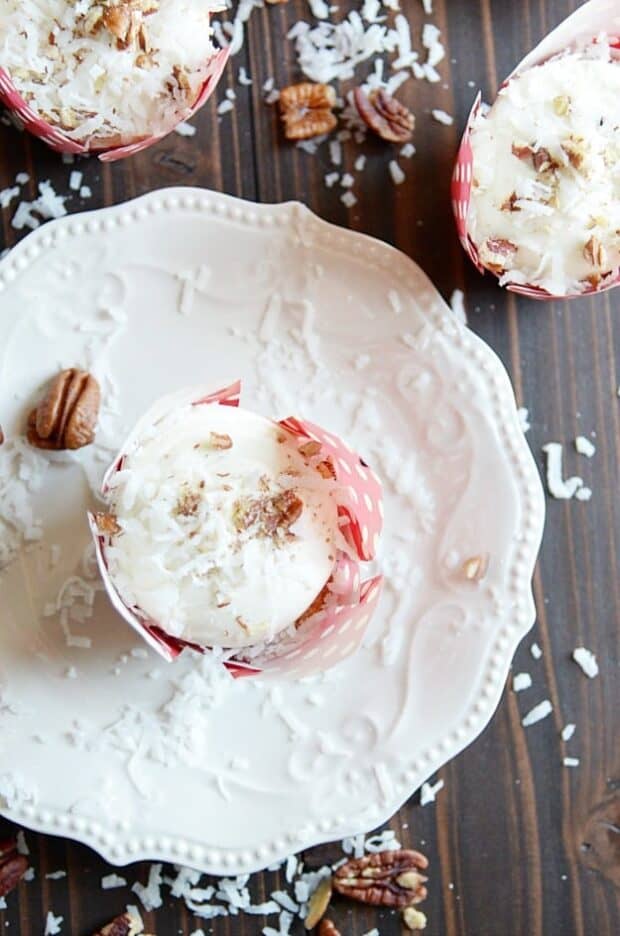
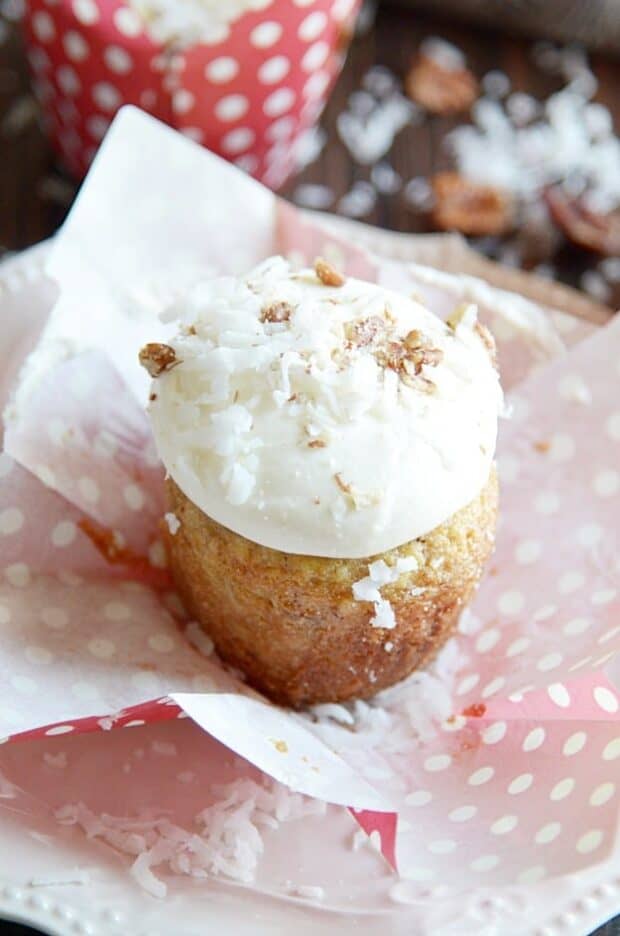
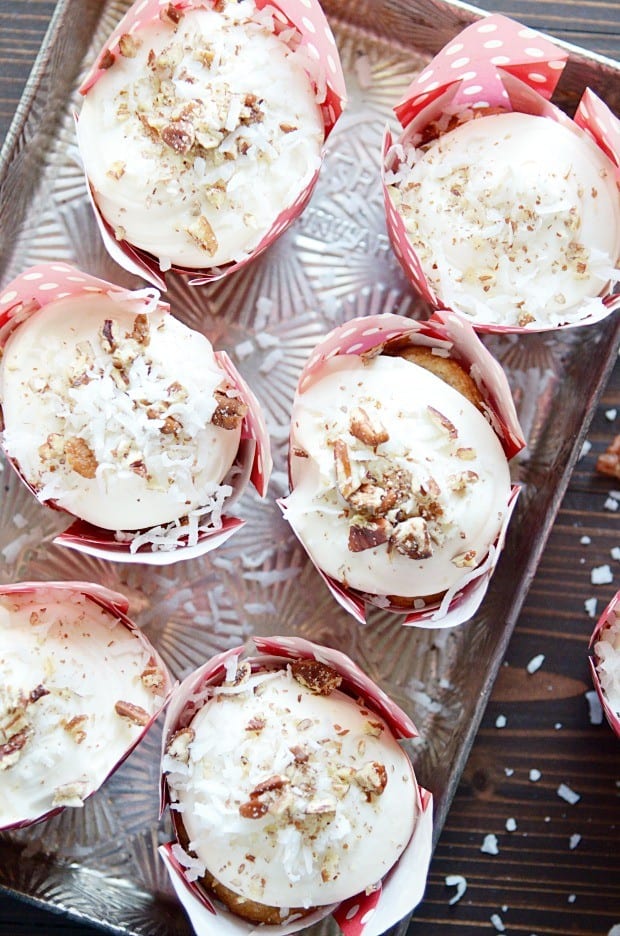
This Southern classic is banana bread and cupcake all rolled into one! A super moist banana cupcake with crushed pineapple, coconut, and pecans folded into the batter topped with an irresistibly dreamy cream cheese frosting.
You already know that I’m obsessed with Southern food, thanks to my Carolina roots. And these Hummingbird Cupcakes are nothing if not good and Southern ????.
…because the fried chicken leg is the obvious official emoji of the South, right? ????
Anyway. The point is, if you are looking for a sweet Southern treat that is perfect for spring and summer, look no further! Banana bread and cupcake rolled into one, these pretty cups are packed with sweet summer flavors and topped with a rich cream cheese frosting.
Step one. You’ll need two overripe bananas, so that you get the maximum sweet banana flavor in your cupcakes. I’ve seen a lot of recipes that call for chopped bananas, but I can’t stand the texture of banana chunks in a cupcake. So in my recipe, we’re mashing the bananas and mixing them into a smooth batter.
Some other ingredients you’ll need:
crushed pineapple, with the juice
coconut
pecans
And, of course, make sure you have cream cheese for the frosting. It’s heavenly. ????
Each tender bite is bursting with the sunny flavors of banana, pineapple, and coconut. Cinnamon adds a bit of warmth to the mix, and the pecans add a perfect touch of crunch.
If you’re anything like me, you’ll feel like these ingredients shout SPRING ☀️ and SUMMER ???? and the arrival of beautiful warm days filled with blue skies.
The thick layer of cream cheese frosting is what elevates these from glorified muffins to glorious cupcakes! It’s my very favorite frosting recipe, because even though it’s rich and creamy, it’s somehow light and fluffy too. And it’s so easy to whip up, which is always a plus.
And if WHEN you make a batch for yourself, don’t forget to tag me on Intagram! I can’t wait to see what you bake up ????!
My twist on the traditional lemon poppyseed muffin recipe! Sweet, soft muffins with subtle notes of vanilla and almond topped with a creamy lemon glaze.
When life hands you lemons… make this lemon poppyseed muffin recipe!
🍋🍋🍋 Celebrate LEMONS with us in this roundup of our best LEMON DESSERTS! 🍋🍋🍋
—>You guys… that pudgy little hand ????! I couldn’t even be mad about him ruining every shot, because his little fingers make my heart explode.
A-hem. Back to the muffins.
Originally, I was going to make regular lemon poppyseed muffins. But the thought of a sweet vanilla and almond muffin filled my brain and so I settled for lemon icing instead. I don’t know what it is about spring time, but it brings out the almond extract lover in me. Constructing a muffin that involves both almond extract and lemon just felt so right.
And a muffin with a glaze? That felt right too. Mostly because I like cupcakes any time of day. And since we’re calling it a “glaze” and a “muffin,” it’s now acceptable to eat this very NON-cupcake for breakfast!
You’re so welcome.
These muffins are super soft on the inside with a little hint of crunch from the poppy seeds. The lemony glaze on top compliments the almond flavor in the muffins and creates a spring time muffin nirvana that you will adore.
Rich and fudgy homemade brownies completely from scratch topped with a decadent chocolate frosting. You’ll never reach for a box mix again!
I found this recipe from my mom in our family cookbook a few years ago when she was compiling it. I was helping her sort the pages into binders for everyone and this particular brownie recipe caught my eye. Related: Here’s an article on brownies. It’s called everything you need to know about brownies.. In the description, my mom had said that it was our family’s favorite recipe that we made every Sunday night.
It stood out to me particularly because I distinctly remember all of our Sunday night brownies– and they came from a box mix…….. (sorry Mom ????).
Here’s the thing. I’m the oldest of six kids. And a lot of things changed when I left the house that I was never a part of.
For instance.. everyone in my family became a dog person my freshman year of college. I came home from my first semester and all of a sudden there was a dog inside the house. On the couches. On the beds. Under the kitchen table. Everywhere we went, the dog went.
To me, it was bizarre. That just wasn’t the way we did pets when I was a kid.
Another boat I missed– my family got all healthy while I was away at school. They may say different (like that they’ve been health conscious all along), but I don’t remember health being a big priority when I was living at home. And now they’re all like runners and conscientious eaters and stuff, and here I am…. with a dessert blog.
Womp womp womp.
I totally got left in the dust on that one.
And the brownies from scratch thing? Yeah, that didn’t happen back in my day. Which brings us full circle back to these apparently famous-in-my-family brownies that we’ve been making for years. And the dessert freak in the bunch, me, didn’t have a clue. ????
I finally sank my teeth into these for the first time about a month ago. The clouds parted and the heavens sang, and I asked my mom, “where can I get this recipe????“
And she said, “it’s the one we always make,” (like it’s the most obvious thing in the world) “it’s the one in the family cookbook.” ????
I may have been the last one in my family in the loop here, but now I can finally share with you my family’s favorite brownie recipe and say with 100% certainty that it is THEE BEST. It’s rich and fudgy, and *omg* that creamy frosting!
Please, please, please– do me a favor and don’t do what I did: don’t sit on this recipe forever and not make it. There’s no reason for you to live one more day without the best brownies you will ever eat. Ever.
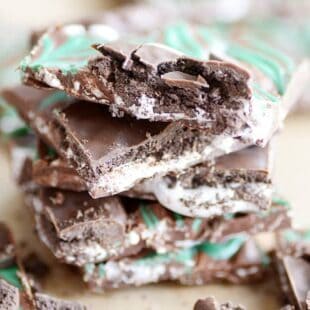
Easy Marshmallow Swirl Thin Mint Bark is filled with marshmallow cream swirls and Thin Mint cookies.
Bark is one of my favorite candies to make. It’s so easy, looks beautiful, packages nicely, and is so versatile. There are so many yummy versions you could make!
I’m especially in love with this Cowboy Bark (copycat) I posted just last week. It’s as gorgeous as it is delicious, and everyone knows that pretty food just tastes better!
This Marshmallow Swirl Thin Mint Bark combines some of my very favorite textures and flavors: rich semi-sweet chocolate, crunchy Thin Mint cookies, and creamy marshmallow fluff. You get a little bit of each in every bite, and it’s such a darn good combination!
I guarantee you won’t be able to stop at just one bite.
Tips for Making Marshmallow Swirl Thin Mint Bark
When making Marshmallow Swirl Thin Mint Bark, it’s important to follow a few key steps to ensure a delicious and visually appealing treat. First, melting the chocolate slowly is crucial. Whether you use a double boiler or microwave, take your time and heat the chocolate in small increments, stirring frequently. This helps prevent the chocolate from burning and ensures a smooth, even melt.
Once the chocolate is melted, you’ll add the marshmallow cream. It’s essential not to overmix at this stage; instead, gently swirl the marshmallow into the warm chocolate. The goal is to create a marbled effect rather than fully combining the two, which gives the bark a lovely visual texture.
After spreading the chocolate onto a sheet of parchment paper or a silicone baking mat, you’ll add the decorative touches. Melting green wafers and using a piping bag (or a ziplock bag for easy cleanup) to create swirls over the chocolate adds a festive and professional look to the bark.
Finally, spreading a bit of marshmallow cream on each Thin Mint cookie before pressing them into the chocolate ensures they adhere well. Sprinkling chocolate chips on top adds an extra layer of flavor and texture. Allow the bark to cool and harden completely—placing it in the refrigerator speeds up this process—before breaking it into pieces and enjoying your homemade treat!
This single serve recipe is perfect for when you need a little chocolate fix but don’t want to make an entire cake!
WARNING: this is where diets come to die… in a rich, fudgy pool of decadent melty chocolate and peanut butter enveloped in a thick, fluffy cake.
I’m just saying.
Sometimes you just need chocolate cake rightnowrightnow. Right?
And when that craving strikes, you don’t want spend the time (and dirty dishes) slaving away over a full sized cake. And you really don’t want an entire cake sitting around, tempting you for days after the craving has passed (because, omg, I can eat an entire chocolate cake in one afternoon without even really wanting to– please tell me that’s not just me?!).
Enter: mug cakes. They are simple and easy, warm and fresh, and they’re ready RIGHT NOW.
It’s brilliant.
These little cakes are a little different from typical molten lava cakes. Because instead of slightly underbaking the cakes to create the lava center, I’m actually adding a brick of chocolate and a teaspoon of creamy peanut butter (!!!!!) to get all warm and melty in the center of this cake.
I prefer this method over the underbaking for a couple of reasons.
One, for some reason the uncooked cake batter “lava” has always kind of weirded me out. I don’t know why– it’s not like I don’t lick the bowl after I make a cake! But something about uncooked batter masquerading as melted chocolate… it just never seemed right to me. So there’s that.
Second of all… since we are microwaving these cakes rather than baking them, the heating method is kind of wonky. We’re dealing with cooking time in terms of seconds rather than minutes, so it’s nearly impossible to be as precise as we would need to be in underbaking the cake the exactly right amount of time. By using actual chocolate in the center, we eliminate the headache of trying to figure out how to keep the center unbaked while nuking the rest of the cake just enough. Fabulous.
I desperately wish that I had some ice cream on hand when I was photographing this. Wouldn’t a big scoop of vanilla plopped in this warm mug of melted chocolate and peanut butter just be divine?
All I had at the time was whipped cream, and that was pretty good too 🙂
Just a few simple ingredients and about 60 seconds is all you have standing between you and this cake. Enjoy!!
A super chewy cookie full of dark and milk chocolate chunks.
If you’ve been around Something Swanky for the past year, you know that I am on a quest to find the perfect chocolate chip cookie. I’ve been chronicling my quest, sharing each recipe with you and my thoughts on what makes each recipe great or… not so much.
If you need a refresher (I know these posts have been getting father and father apart), here are my top 5 favorites:
I’ll be the first to admit that most of the chocolate chip cookie recipes have started to blur together. While I haven’t tried a recipe yet that I didn’t enjoy, those five have really stood out among the others.
And where does this recipe fall?
This recipe, Dahlia Bakery’s All-American Chocolate Chunk Cookies (a recommendation from one of my readers), might have just made it to my new favorite. Or at least my second. I’ll need to do a few more batches to know for sure, but either way– this is a darn good chocolate chip cookie.
A lot of the reason these cookies are so good is because you need to use a really good, high quality chocolate. Two high-quality chocolates, actually. I chopped up 1/2 of two different Trader Joes pound plus bars for my cookies. I use TJ’s chocolate in my cookies whenever I can. Most other bakers I’ve talked to agree it is the best in cookie baking.
As the title implies, there’s double the chocolate in this recipe! Milk chocolate and semi-sweet chocolate chunks really take over the dough. This is a seriously chocolate-y cookie, in the best of ways. Be sure you have a tall glass of milk on hand!
Another thing I really like about these cookies: you cream the butter and sugar together for a full 5 minutes. What does this mean?
It means you are seriously aerating these cookies. Adding that extra air ultimately helps them puff up in the oven. Which in turn leads to a bigger “deflate” after they’ve been removed from the heat. Which means thicker, chewier edges.
And that makes me really happy.
The last thing that I really love about these cookies? They.are.huuuuuuuge.
I’ve said it before a million times, but I’ll say it again. When I eat a chocolate chip cookie, I want it to be the size of my face. And if it’s not the size of my face, it had better at least be the size of my hand. I don’t like small cookies!
Honestly. Why do small cookies even exist?
Anyway. THESE cookies are not small. Using an ice cream scooper, you scoop 1/4 cup of dough for each cookie! That’s about as big as you can go without having to get drastically creative with the bake time and temp. I experimented with a few bake times for these cookies, and I was really happy with 10 minutes in my oven. It kept the centers soft and slightly underdone with golden, chewy edges.
If you’re a chocolate chip cookie freak like I am, put this recipe on your must-make list right away! It will be an instant favorite in your kitchen 🙂